Route Editor
The Route Editor lets you add your own routes to Biketerra, and contains various tools to help you tune and improve the quality of your route.
Uploading
You can upload any FIT, TCX, or GPX route. After uploading, it will display instantly on a map, allowing you to further edit the route.

Route creation tips
We advise caution in uploading routes recorded from GPS bike computers, since they often have inaccurate elevation data. This can be manually corrected in our editor, but alternatively you may prefer to create a route using a dedicated tool.
The following tools allow you to upload existing GPX (to clean up the elevations), or draw new routes from scratch:
After drawing a route or uploading an existing GPX, click the "Request elevation data" button in the left toolbar. Then export the GPX and upload to Biketerra.
This requires a paid Strava account. After drawing a route or uploading a GPX, export it to GPX or TCX, then upload to Biketerra.
⚠️ Unsupported route types
For the time being, our route engine is designed only for non-overlapping routes, meaning your routes should not contain intersections or overlapping segments. While the route may still work, there may be visual glitches or issues that end your ride prematurely.
If you want to create an entirely out-and-back route from point A to B and back to A along the same road, you need only upload the section from A to B; Biketerra will create U-turns at each end to allow the return journey.
If you have a route which in part includes an overlapping out-and-back section, this will likely raise issues. In the near term you can try to resolve this by ensuring the out-and-back section does not overlap itself.
Full support for junctions and overlaps will be coming in 2026.
Editing
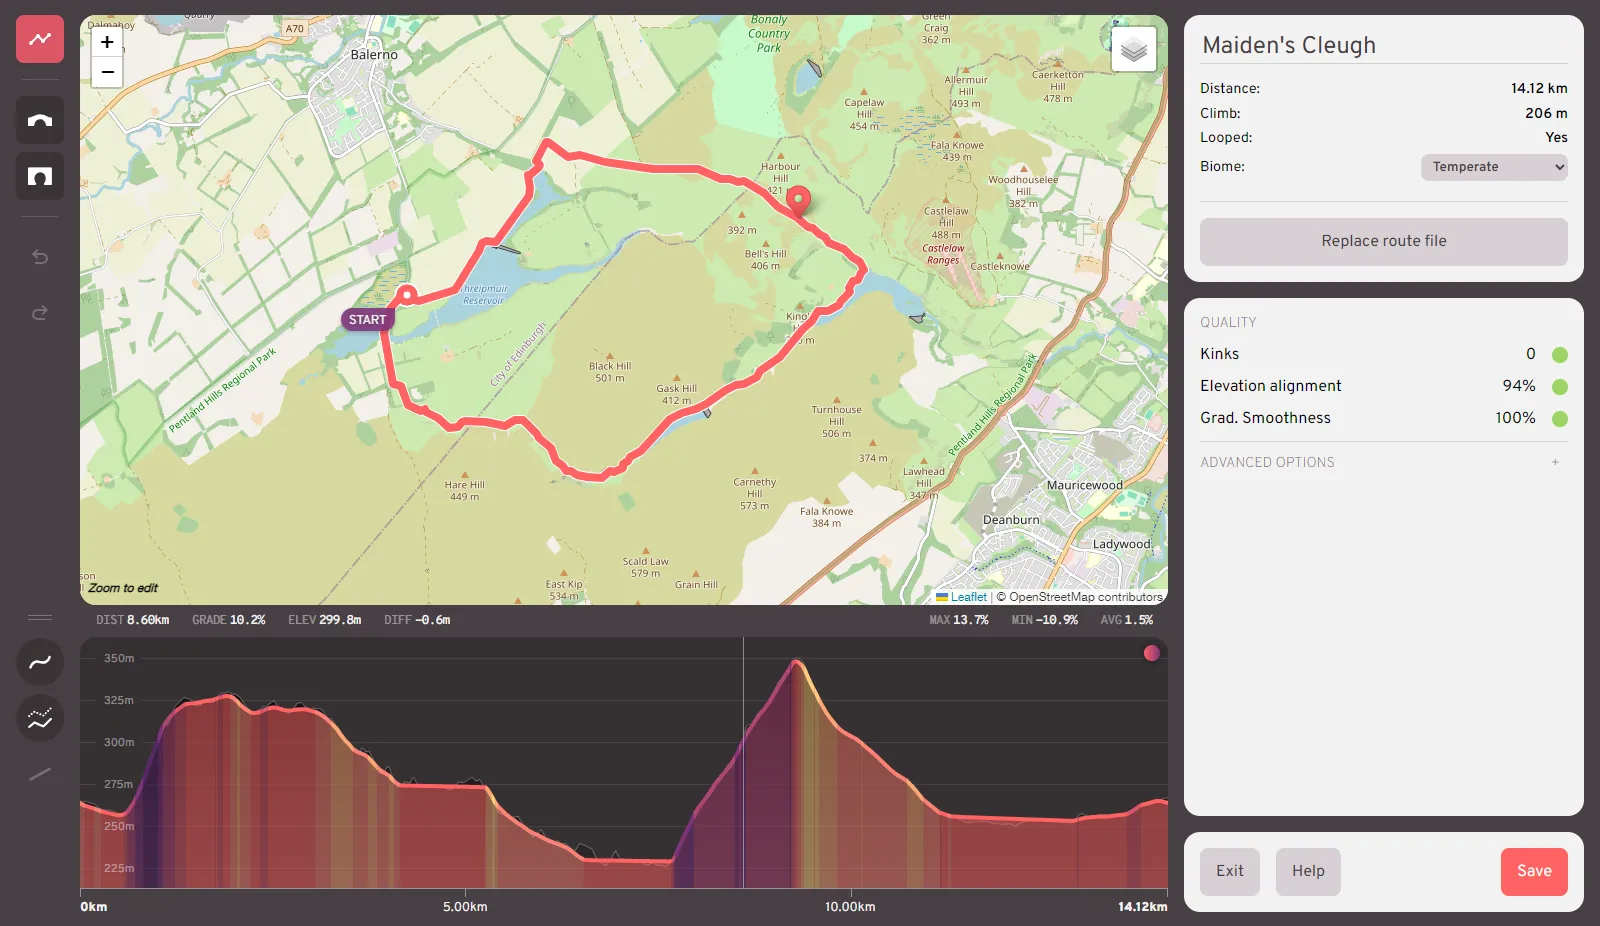
Biketerra's Route Editor allows you to modify your route's path and elevation, and attach annotations such as bridges and tunnels. You can find an overview box in the top-right corner, displaying your route's name, its distance and climb, whether it is a looped route, and the biome it should be rendered in. The route's name and biome are editable in this window.
The editor features an undo/redo feature. After any action that edits the route, you may use the Undo/Redo buttons in the left toolbar, or use Ctrl-Z to undo, and either Ctrl-Y or Ctrl-Shift-Z to redo.
Path editing

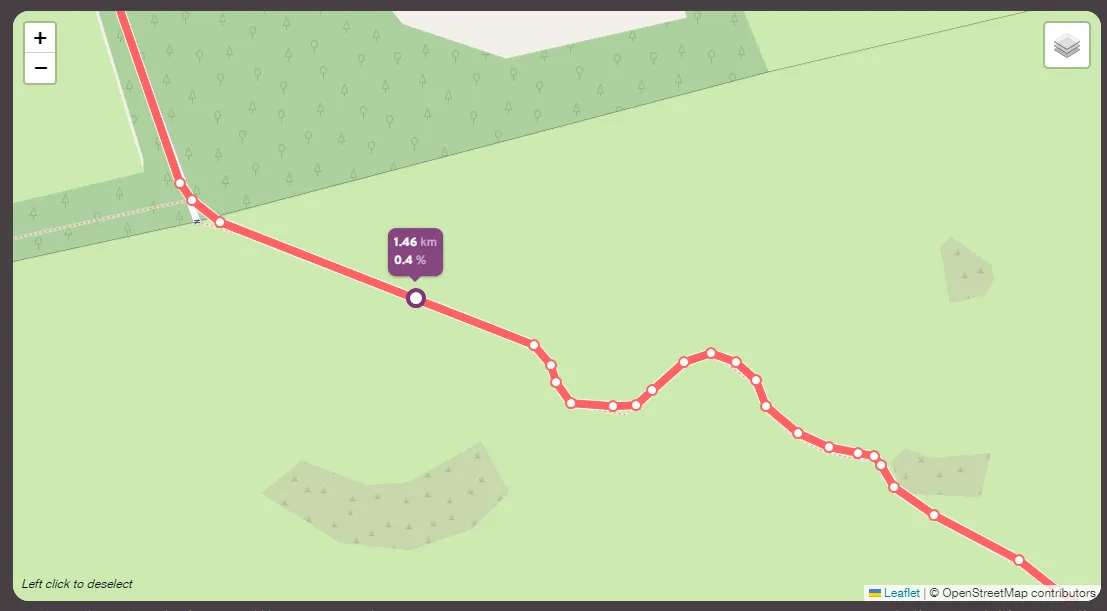
Your route's path can be inspected and edited in the map view. In order to edit the path, you must first zoom in to the region you wish to alter until the nodes are visualised as white dots. With these nodes visible you have various options for interaction:
- Hover on a node to view its distance and grade values
- Left-click a node to select it. You may select multiple nodes in this way by holding the Shift key while you click subsequent nodes. Alternatively, while holding Shift, you may click-drag on the map to use box-select.
- Right-click to deselect all nodes
- Delete selected nodes by pressing the Delete or Backspace key
- Click and drag selected nodes reposition them. You will see a dotted preview line while dragging. Once you release the mouse, a loading bar may appear while elevation data is updated for the change.
- Click on the path to insert a new node at that point. You can also click and drag to enter into reposition mode on the newly created node. In this way it is simple to insert new points into the path if needed to add extra detail.
- If you wish to create a looped route which has not already been automatically closed, you can click-drag either the start or finish point over the other until they snap into alignment
Elevation editing

The elevation graph allows you to zoom and pan with the mouse and inspect the altitudes and elevations of each point along the route. Hovering over the graph will update the summary stats in the top-left, showing you details about the distance, gradient, and altitude offset of the hovered position. In the top-right you can see summary stats for the whole route - the maximum, minimum, and average gradients. Hovering over the max/min values will highlight them in the graph and map.
That the elevation graph can be resized by click-dragging the horizontal divider in the left-hand toolbar. You may also toggle between outlined and filled view using the button in the top-right corner of the graph.
You may interact with the graph in the following ways:
- Select a region by holding Shift and then click-dragging across the graph. After releasing the mouse, you are able to adjust your selection by click-dragging on the left/right borders of the highlight. You can also click-drag using the middle mouse button for region selection. Selecting a region will update the summary stats in the top-right of the graph to show the summary for that region only.
- Deselect using right-click anywhere
- Delete a selection by pressing the Delete key
- Zoom into the graph using your mouse scrollwheel. Individual nodes will be visualised on the line when zoomed beyond a 500m scale.
- Pan the graph by click-dragging on any empty area of the graph. You may only pan if zoomed.
- Adjust route altitudes by hovering over the altitude line until the circular cursor appears, then click-dragging up or down. The size and strength of the drag effect is determined by the zoom level: for large-scale changes, zoom out; for small details, zoom in. Beyond a 500m zoom scale, individual nodes will be visualised as white dots. These can be individually adjusted by click-dragging them; the neighbouring points will remain in place. While dragging an individual node, the live status in the top-right will display its new altitude value.
The elevation graph also features its own tool buttons for elevation editing, in the left-hand toolbar:
Smooth gradients applies a gentle smoothing filter to the whole route by default, or will be constrained to any regions you have selected. You may press this multiple times to repeatedly apply the filter if needed.
Reconcile altitudes will align the route altitudes with their corresponding ground elevations. This can be applied across the whole route or selected regions. Be warned that this may result in sharp results; elevation data does not necessarily align accurately with the smooth path of roads. It is advised that you apply smoothing after reconciling a region.
Average gradient will only be enabled if you have regions selected. This will flatten the selected regions to enforce a constant gradient across them. This may be a useful step for any bumpy sections which need to be flat but which are not being adequately smoothed by the smooth tool, such as paths alongside water.
Bridges and tunnels (brunnels)
After uploading your file the editor will perform basic processing to automatically annotate sections likely to be thinks are bridges or tunnels. However, this process is liable to error and highly influenced by noise. It is advised that you confirm the brunnels are as you expect before saving your route.

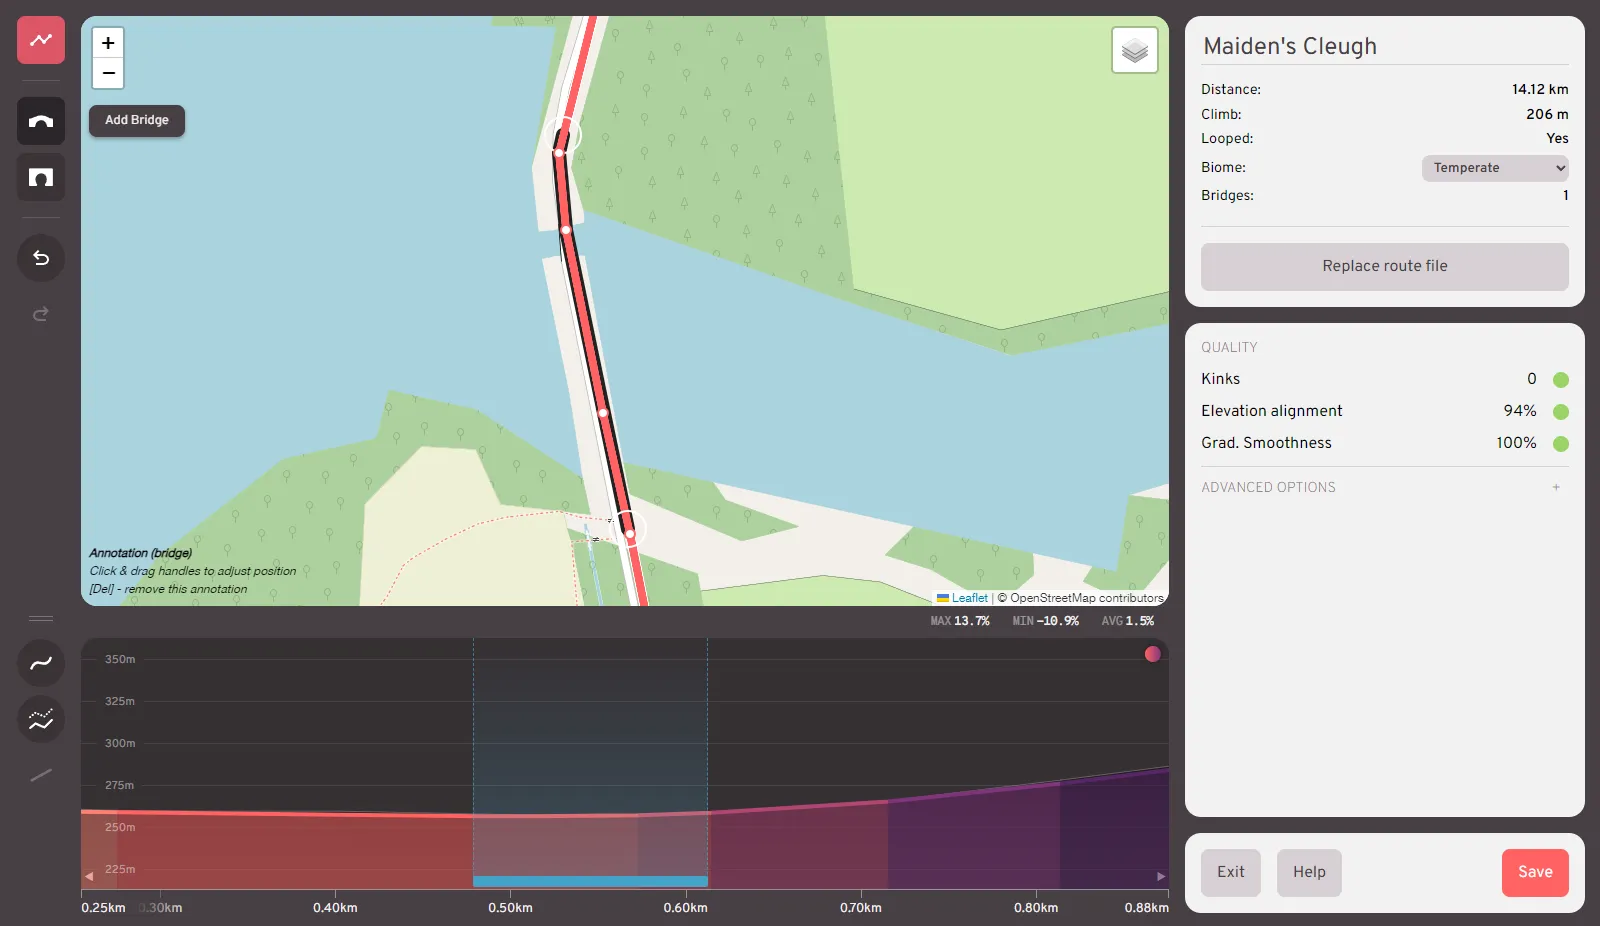
Brunnels are visualised in both the map view and the elevation graph. In the map view, a solid grey underline shows a bridge, while a dotted underline shows a tunnel. These can be resized by zooming into the map and dragging the circular handles that appear at either end of the annotation.
In the graph, bridges are highlighted with a light blue band, while tunnels are shown in orange. You may edit these by first clicking the band to select the brunnel, and then click-dragging on borders of the highlighted region.
Brunnels can be created using the bridge/tunnel tools in the left-hand toolbar. Zoom into your region of interest in the map or graph view and select the tool you wish to use. If using the map view, click once on the path at the start of the annotation, and then once again at the end point to place your brunnel. If using the graph view, click, hold, and drag across the region you wish to annotate as a brunnel. Once placed the end-points can be edited as above. You may also create brunnels by first selecting a region of points and clicking the corresponding tool button to convert that selection into that brunnel type.
You may delete a brunnel by selecting it either in the map view or graph view and pressing your Delete key.
Quality
In the route editor you will see a Quality panel on the right-hand side indicating how smooth and ridable your route will be.

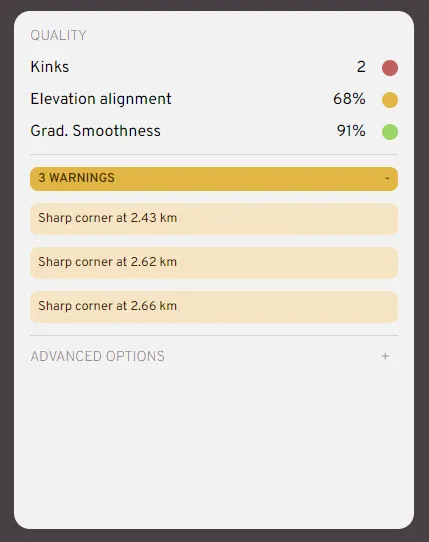
Kinks are any sudden, sharp bends in the road which are so tight as to cause potential errors. Where possible these are resolved automatically by a dekink process. In severe cases, this automatic process cannot fix the problem, and it must be solved manually. View the warnings list (see below) to identify offending sharp corners. You may resolve kinks by manually dragging points back into alignment, or selecting and deleting the offending points.
Elevation alignment scores how closely the route is aligned with its underlying elevation. Significant differences will cause visual problems but will not prevent the route from working. The offset can be inspected in the elevation graph - the coloured line shows the route's altitude data, while the underlying dark background outlines the elevation of the land. Hovering over a point in the graph will also display the altitude-elevation difference (DIFF) in the summary stats. You may improve the elevation alignment of a section by click-dragging on the altitude line to pull it closer to the underlying elevation. Alternatively, you can use the "Reconcile altitudes" tool on the left-hand toolbar to better align the altitudes with their underlying elevation. This tool will work on the entire route by default, or can be constrained to selected regions. Note that a perfect 100% score is not necessarily a good sign, as elevation data may not precisely match the intended altitude of the road at that point. Sections with brunnels are not factored in to this alignment score.
Grad[ient] smoothness relates to the change in gradient over distance. Using noisy source data may result in many ups-and-downs which make for an uncomfortable riding experience. Pressing the "Smooth gradients" tool button will apply a pass of gentle smoothing on the route's gradients. You can also apply this tool on specific regions by selecting them in the graph. Repeated presses will smooth the route more, but may also lose significant features. With a region selected, you may also use the "Average gradient" button to flatten that region into a constant gradient.
Warnings highlight points on the route that may be too sharp to be rendered correctly. Hovering over each warning will show a marker in the map view at that point, and clicking on a warning will zoom to that point. If needed, you can smooth a corner by clicking on the path to create more points either side, or move/delete the offending points until the warning disappears.
A good quality route will have all green lights in the quality panel, with no outstanding warnings. Quality scores of 100% are not necssary; in practice anything above 90% should bring good results.
Advanced options
- Show splined route will visualise the path of the smoothed route in the map view, as it will appear in the ride. The splined path can deviate from the raw input points slightly depending on how densely spaced the raw points are. You may use this setting to verify that the spline behaves as you expect. Note that the deviation may be especially pronounced in areas where the route nodes are inconsistently spaced, e.g. dense around a corner and then widely spaced along a subsequent straight section.
- Revert my changes will undo all edits made in the session and restore the route to its initial state.
- Revert all processing will undo all edits made and all automatic processes, such as any automatic smoothing, brunnel annotations, and elevation reconciliation applied in the background when first loading a file. This will restore the route to its most raw representation, as it is in the file you uploaded. Use this setting only if you know your input route file to be of high-quality, containing specific features you don't wish to lose.
- Dekink will resolve kinks in the route. Kinks are unreasonably sharp corners which are likely to be errors in the route file.
Saving
Routes are private by default, meaning only you can access it.
On the route detail page, you could change the route's privacy to limited (allow others to access it with the link), or submit it as public. If approved, it would then appear on the public routes listing.
